Monday, April 24, 2017

Warlord Games Panther Ausf. A plastic kit Build Review

As part of the Wheels of Steel offer by Warlord Games, I got myself the plastic  Panther A, that I wanted for quite some time.

The tank comes in the standard paper box containing 2 grey sprues, one sheet instructions manual and a decal sheet. The decals sheet was missing in my box, but the good folks at Warlord sent me a replacement one

With this tank I've decided to build/paint it a bit differently and to keep the running gears and tracks separate until the final weathering stage. Thus I've skipped the first step and built pretty much everything else. More on this once I start painting and weathering the Panther

As I prefer my vehicles to look a bit battered, I've removed some of the side skirts - this required some sanding and filling due to the attachment system - you can see someone was thinking here, so the skirts should survive some rough wargaming. I have also cut down the front mud guards - these were missing quite often and I wanted the muddy tracks to be visible.

Side skirts attachment system - you need to remove these


Cutting down the mud guards


Once this was dealt with, I've glued together the lower and upper part of the hull - which was a mistake, because you need to glue in the front machine gun first - it's doable later on (as I did), but it's better to do it before gluing the hull together. However the machine gun is a bit too small for the hole, so in the end I've filled it with some green stuff and then pressed the MG into it.

MG hole filled with green stuff


Rest of the build should be pretty straightforward, however the manual isn't really helping here - you need to study the final pictures to understand where should these go to, so go slow here!

Enhanced instructions


Construction of the turret is over in few minutes, I've skipped the "don't glue this with that, so you can elevate the gun" and glued the gun solid. Also I've kept the commander's MG separate for now, so it doesn't get broken during painting.


And that's pretty much it, in the end an hour of pleasant modelling, all of the parts fit really well and the tank looks awesome - can't wait to paint it next. Much recommended!


Monday, January 2, 2017

2016 in miniatures - what I've painted and what fun I had doing that

2016 was a pretty good year miniature wise - in total I've counted 95 fully painted finished miniatures  - not counting numerous WIP projects like those 30-ish Brits for Sharp Practice that will be on top of my painting queue for 2017.


My plan for 2017 is 150 fully painted minis and to reach this I'll be posting monthly summaries


Chain of Command 20mm

US Infantry in 20mm for Chain of Command


I have painted 40 20mm US Infantrymen for CoC - mainly Italeri plastics together with few of winter ones from Revell. I managed to get them done in less than 3 weeks which is a pretty nice time considering I took my time with them detail-wise and didn't rush anything, it was just a matter of discipline - painting 40 pairs of boots, 40 helmets, webbings - each of these might sound extremely tedious, but they weren't, but this approach allowed me to move quickly towards the common goal - fully painted army.

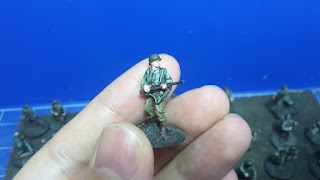
One of the 40 US Infantrymen in 20mm (1/72)


M-8 Greyhound - Italeri - absolutely lovely kit that went together really well and I've also really enjoyed the weathering side of it. This was the first time I've used the modulation paint set from Ammo, here I've learned the layers need at least 24 hours in between them AND you need to be careful how you apply the lighter colours. Nevertheless, M-8 turned really well and is a model I'm really proud of. Can't tell how long it took as there were weeks when I didn't touch it at all (I do absolutely hate decal application)


Fiat 621 - First to Fight - again a gorgeous little kit that I bought just because I wanted to buy myself something. Construction took me probably 2 hours, followed by quick airbrushing session - here I've properly tried to brighten up the blue colour and the result is IMHO pretty great. Various shades of Ammo and AK washes for the wooden part of the truck and it was all done.


Panzer IV wreck. I came across the Panzer IV sprue in our LGS discount bin and immediately knew I wanted to turn it into a wreck. In the end I've managed to turn it into two - blown out turret (usable as jump off point for CoC) and the hull - here I've scratchbuilt the 'interior' using plasticard and bits from a Coke can. Hairspray technique was used for the chipping.


Italeri Church was again a darling of a kit - few pieces that went together very well, however the painting was a bit tedious - basecoats were applied with some Montana spray cans (brown-geyish tone) followed by multiple layer of drybrushed greys, but in the end the church looks absolutely stunning.


I have also built 3 town houses for our CoC games - all inspired by the buildings typicall for the Battle of the Bulge area, these were all made from XXX - all in all a weekend worth of work, yet they are very significant aspect of our CoC tables. Same goes for a dozen or so hedges out of steel wire topped with model railroad foliage.

Modern 20mm


T-55 - Trumpeter in 'abandoned by Soviets, used by Afghan locals' camo - simple, yet nice kit from Trumpeter and again hairspray for the dozens of scratches and a decent amount of various pigments for the non-maintained look. Very happy with this one.


PT-76 from god-knows-what-Eastern-European-company - this kit was a pretty good short run, yet still far from the Lego style Trumpeter kits, specially the tracks were a challenge. I wanted to make sure these two tanks did not look the same, so I've used a bit different shade of yellow-green, went a bit wild with the scratches followed by only tiny amount of pigments - this one's been neglected, but it's still semi-operational.


'Not really finished, but I'm still really proud of them' - M1A2 SEP TUSK II by Tiger Model.
Stunning kit in 1/72. Can't wait to paint this sweetie.
LAV-25 - Ace Model. OK, this is a proper short run - very rough details, absolutely necessary to get a metal barrel, but in the end you get a wonderful vehicle. I've also gotten myself an baggage set from Black Dog for the proper 'gypsy wagon' look.


28mm Fantasy

Underground Temple - scratchbuilt from cork bark. This was a late night idea 'I want a dungeon-ish tile', after I've made couple of the flat tiles originally to be used for Frostgrave. These two tiles are designed to be used below the flat ones, so you can really get a proper underground action on the table.


It's also a wonderful photo background
Flint Stone Church - Gripping Beast. One piece resin church that was a bit of asshole to paint as I didn't really choose my greys well and had to repaint it once or twice to get an ok look. It's okay, but I'm not really happy with this one.


Female Cultists - Pulp Figures - gorgeous figures and also the first ones where I've tried the Nocturna flesh set - love them + a very useful set of figures - I might even use them for my 28mm WW2 Germans ;)


Heresy Miniatures Zombies - LOVE, LOVE, LOVE!!! Go buy some minis from Heresy Miniatures as they are just lovely. I've really enjoyed painting these - Nocturna flesh set again and in the end, some of the zombies look REALLY awful (in a good way)


Zombie Troll - Mantic Games and Targ - Privateer Press - nice and funny minis that I've enjoyed painting.


Vampire Lord - Kickstarter and an Evil guy - Avatars of War

Troll - Copplestone Castings 


Frostgrave Adventurers (North Star) with female heads (Brother Vinnie) - although they do look OK, these were NOT fun to paint. I think the fabrics are sculpted in a weird way that does not really help with the painting.


Giant Rats - North Star and a piggy - Ristul


Innkeeper - Reaper, Lillie Poots - Statuesque, Scarecrow - unknown

Lil' warrior - Hasslefree

Female Cleric - Otherworld - This is my Mini of the Year.


Pulp Santa Claus - North Star


95th Rifles - Perry Plastics


British Light Infantry - Perry Plastics with Victrix metal heads


Thursday, January 14, 2016

Tiles, tiles, tiles! Making gaming tiles out of cardboard and styrofoam

For quite some time I wanted to make myself a gaming table at home.
Initially I planned on using big styrofoam desks that would form a 3x3, 3x4 table.
However, the wife was not pleased (too big!), so I had to look elsewhere.
Gaming mats are the buzzword lately, however - they wrap, you need to have a big enough table and they are bit boring. Plus they are 2-D!

In the end I got this terrific idea to build a customizable gaming area using 1"x " tiles made from cardboard and thin styrofoam. The logic is to have a very variable system, that would allow me to play on anything from 2x2 to 2x3, 3x3, 3x4.. you get the idea. A system that would fit on our dining table and I could easily take it to my FLGS - the tiles need to be on the flat side.


All painted and ready to play!


Onto the actual tiles - 3mm cardboard followed by approximately 5mm styrofoam - glued together with PVA glue. Once the glue has been applied put a lot of books on top of it to prevent warping. It will happen anyway, but the good thing is, you can easily fix it - just be careful and don't break it.


Now the fun part begins - I wanted city terrain, which means pavements - Initially I was thinking about using DM Scotty's stamping method, but then again, this wouldn't be proper 3-D. So I opted for carving the individual stones into styrofoam.
First I draw all the stones using a ballpoint pen, followed by carving the stones using one of the sculpting tools. If I pressed the pen a bit more, I could probably do it all at once, but I do like to draw it all first, correct mistakes and carve later (measure twice, cut once). The system for drawing the stones? Try to be chaotic! I'm trying to mix the orientation of the stones often - having all of them in one direction seems a bit boring. It usually takes me an hour, hour and a half to draw and then carve the stones - but this is something you want to do while watching telly, being on an endless confcall - it does take a while!


Work in progress

Detail of the stones - you want to mix it up!


Once cut, take some cheap black paint, big brush and paint it all black. You want your paint to be thin, as you want it to go into the cracks. Once dry mix some gray and start drybrushing. It took me 3 or 4 layers to get to a result I liked - it's better to start with a dark gray and then gradually lighten it, until you end up with pretty much pure white - this will be the lightest drybrush.

And done!


You can remove an occasional stone here and there to give the tiles a rougher look, you can use a wire brush to add a bit of rough look to the styrene, however the drybrushing alone will do that for you later on.

My plan is to have at least 6 of these with just the pavement, then some more with part pavement/part mud/rocks/earth and maybe some water - thinking about harbourside.

Durability? 
Good. Of course I haven't tested it properly, but the paint appears to stick really well (cheap acrylics), moving figures around is nice and easy (they don't stick to it, no wraps they would fall over), any minor warps can be easily fixed and tiles connect well to each other - well they lay next to each other, so if your table is flat, so will they.
Also dice roll pretty well on the surface as well.


Tuesday, October 6, 2015

Recon Patrol - Skirmish Sangin AAR

Finally. A proper Skirmish Sangin game!

What sounds like a miracle did happen - earlier today I played my first proper Skirmish Sangin game.
How was it? Did I have fun?

OMG, this game is so cool, I wanna play it again!

The End.


So for those of you, who would want to read more, here is an AAR of our first Skirmish Sangin demo game, between me (as Taliban) and a friend of mine who took control of two USMC fire teams.

As this was an introductory game, I chose a scenario that seemed as the most accessible - Recon Patrol from the main rule book:

After three hours of patrolling the streets and fields surrounding the village, Bravo Section begins its return to base. It’s at this point that the Taliban springs their trap and Bravo Section is involved in a short but intense fire-fight from which its withdraws. The section retreats towards the rest of the platoon but as they are working their way through the streets get confused and take a wrong turn. The platoon finds itself outflanked, spread along one street with Taliban forces at both ends and its here the game begins.

Start of the game


The scenario has two ISAF fire-teams being outflanked by two Taliban teams, so both players have similar forces to play with. We did not roll for the Body attribute for the individual soldiers, but used the numbers from the book.

The game started with the USMC guys moving from the Humvee towards the enemy on both ends of the table. One of the soldiers immediately loaded his UGL in order to finish a whole group of insurgents at once, however he had to find them first.
Quite soon we had our first casualty, when an eager Afghan youth met his demise as he ran round the corner to shoot some Marines - he missed and was killed on the following turn.
He thought he could peek in and shoot them. They shot him.

Few turns followed when nothing happened, both sides were moving around until one of the Afghans realized he had an open shot and shot the Marine with loaded UGL from the back - serious wound and an unconscious soldier on the ground.
No cover? You will be shot, my friend!


At this moment it looked like that this will turn into a victory for Taliban, which unfortunately (for me) was not the case. The Marines started to move around and methodically reduced the threat with luck being on their side and them hitting the insurgents with at least a couple of very improvable shots (To hit rolls between 12-15).  
Surely this is a great position for the Taliban force..
Well that depends - you need to hit them, otherwise they will hit you!


One of the Afghans was surely not having the best day when in two consecutive rounds didn't manage to hit a Marine 2" away from him with no cover at all - his LMG would rip through the body armor like butter - two misses and a shot in the back of his head from another Marine was the end of this unlucky lads day.
Peekabo! (Missed him twice, was shot in the back)

As the Taliban side evaporated with only two remaining insurgents standing and only one critically wounded Marine (one of the guys managed to hit the wounded soldier one more time), this started to look like an absolute disaster, however the Marines started to be a bit too eager - and not sticking to cover resulted in another critically wounded soldier. To add insult to injury, one of the Marines, who saw his mate fell down failed his morale roll so badly, that he immediately ran for cover and a turn later deserted for good (counts as a casualty for the insurgents).

Second Marine is hit


This was the last 'hooray'moment for Taliban as the brutally outnumbered insurgents were killed one by one pretty quickly afterwards.
Only one Tango left


So this is where I share my impressions:

  • The game is so much fun! Honestly I can't recall if I ever had so much fun on a tabletop!
  • Even for a first proper game (only played one solo game before) this was an amazing, suspense experience
  • The game might look like it requires a bit  too much bookkeeping with all those counters and stuff, but honestly, this is absolutely not true - you won't even notice it once you start playing
  • Same thing with the various calculations - there's a pretty long list of modifiers for shooting and spotting, but again, you will remember these pretty soon and they are actually pretty simple and logical
  • The game has a very strong narrative element - it really is an RPG hybrid - it's not just two sides meeting on a battlefield, it really forces you to come up with a story, give your game some meaning.
  • It's fast! The phases are quick, you get a few seconds to plan your next move as your opponent activates one of his guys and then it's onto you again
  • I need to make some IDs for the figures - I have their names on their bases, but that forces you to turn them around, so need to come up with something better
  • If you're thinking about Rambo - forget it, this game is brutal and no cover means you will get shot at and most probably killed immediately - you need to be cautious and patient
  • Game time 120 minutes - even with table setup, quick rules introduction and us looking up stuff from time to time 
  • I can't wait for my next game

End game


I do plan a few more demo games as there are several guys who are interested in this - and I definitely need some more targets for my Taliban force.